¶ Antenna Selection
Antenna selection can make a massive difference to the outcome of your experience of Walksnail. This is mainly down to the fact the system only uses a single TX (transmit) antenna. Therefore it is important to choose the correct antenna setup for the type of flying you plan to do. See here for a quick explanation. We need to think of the 4 goggle antenna as 4 parts of a single antenna rather than 4 individual antennas; the 4 antenna work together as a single entity, it is therefore advised to closely match your antenna - same type, power dBm and alignment (where possible).
Also… the transmitting antenna is not a special antenna "for transmitting". You can use any 5.8g antennas, even if it's not labelled as "for digital" in some stores, if you make sure you have matching polarity and connector. (Michal Proctor Spilak).
And…you can use the o3 dual component antenna on the Walksnail dual antenna VTXs (although performance will be restricted given the linear polarisation of the antenna). (Chris Woods)
¶ Pushing Range
Something to bare in mind when pushing range with Walksnail is that if you encounter black screen your feed may not return immediately. The 'handshake' (the reconnection of the video link) requires more data to establish than it does to keep active and so it might not succeed if your bitrate is in the 1-2mb territory. This is as a result of the system only containing a single TX on the goggles/VRX. It is therefore important to have a reliable and well tested RTH (Return To Home) procedure on your craft.
¶ Camera Settings
Walksnail is constantly evolving with each firmware bringing adjustments to how the compression/smearing is dealt with. To clean up the image 3dNR and 2dNR have been introduced into the system. These along with altering the basic camera settings; scene (Day, Race & Night), EV and sharpness as well as changing the ouput resolution (720/1080) and bitrate (standard-25mb & high-50mb) will drastically alter what smearing occurs and how the video feed looks. Its just a matter of choosing settings that best fit the flying scenario. Factors that appear to especially contribute to smearing are low exposures (dull & gloomy) and too much sharpness therefore increasing the brightness (EV) and reducing the standard over-sharpened image should make an immediate difference.
Settings which appear to yield good results are;
- 1080/50mb
- Camera Scene - Day
- EV - +0.3
- Sharpness - 3
- 3dNR - Mid
Of course smearing may never be fully removed as there are many contributing factors, however using these settings does appear to make a difference
- 3D DNR performs blurring along the motion path of the noise to produce a motion blur, the system default is auto, which is turned up higher in night scenes.
- 2D DNR does a small block blur of noise, which is used by DJI and GoPro to deal with noise in a way that blurs the image even more.
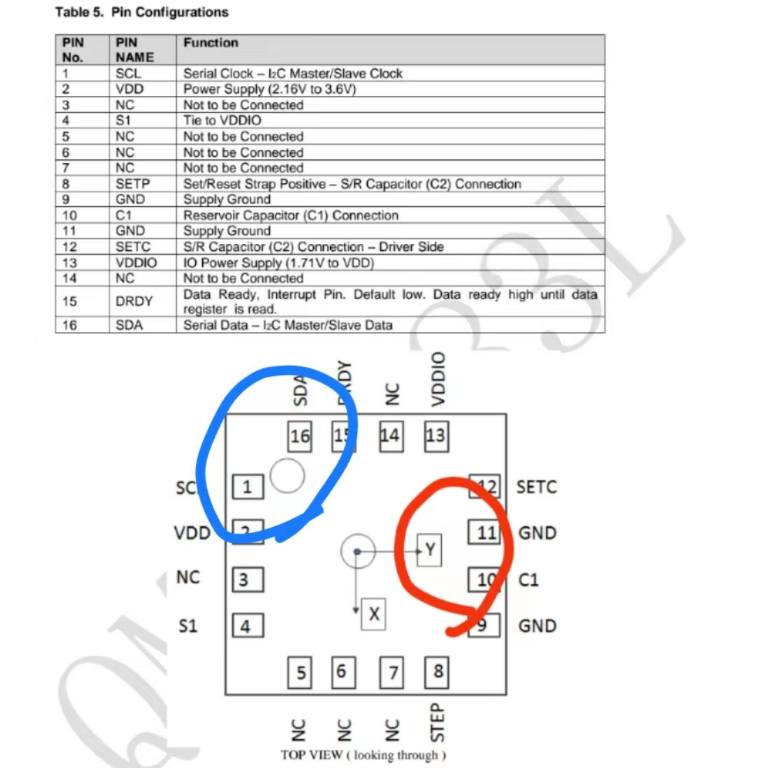
¶ Walksnail WS-181 GPS/Compass alignment
 |
 |
The X axis should face forward, Y axis should face left / port side. The Z axis on the chip is supposed to face up, but since the GPS antenna has to face up you have to flip then rotate for proper alignment. it's customary to flip along the Y axis (pitch) 180° first, then rotate around the Z (yaw) from the perspective of the Magnetometer.
For inav set the mag alignment to CW270filp then use the alignment tab in the configurator to re-orientate the unit to how its mounted. With the connector facing rearward thats yaw90 and roll 180.
In Betaflight with the antenna facing skywards and the cable connector facing forward, use a Magnetometer alignment of CW 180° Flip.